Four Ways to Save OverRec Screenshots for Chats, Documents, and File Workflows
- Metaphor Projects
- Application
- 07 Oct, 2026
What do you do after taking a screenshot? Paste it into a chat, keep the original for a bug report, or pass its file path to an editor or script? Each task calls for a different way to handle the captured image.
OverRec offers three screenshot settings you can combine to match your next step. Skipping a trip to the file folder, a search for the latest image, or a manual path copy makes repeated captures easier.
Meet the three options
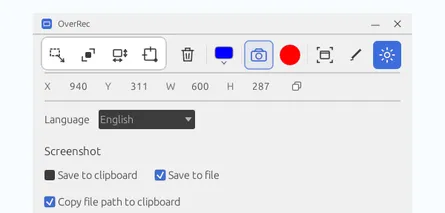
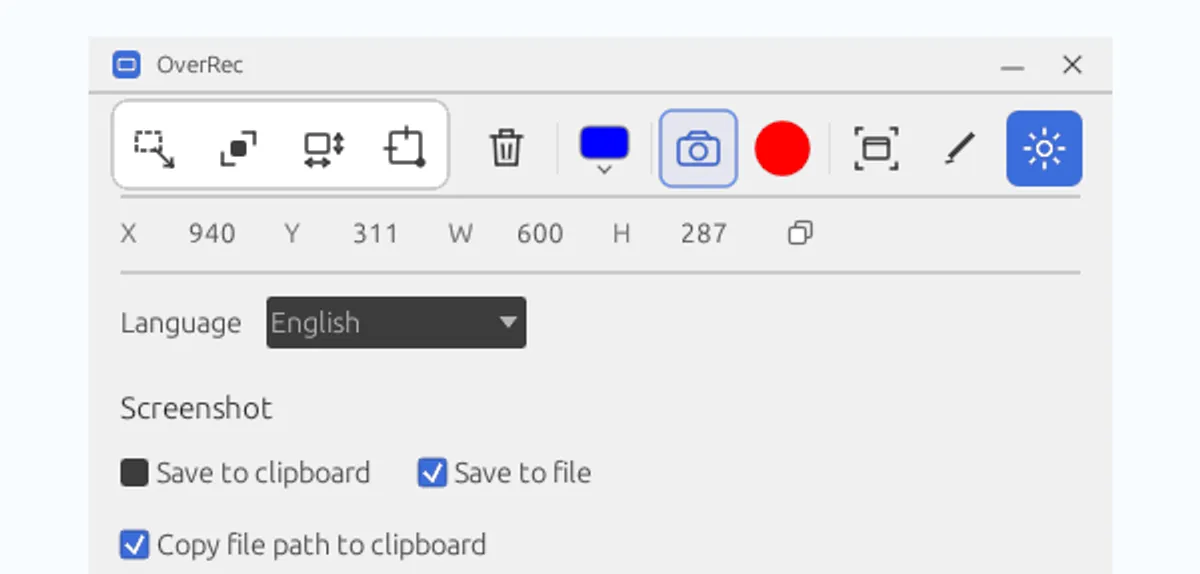
The Screenshot section in the image contains:
- Save to clipboard: copies the screenshot as an image, ready to paste into apps that support image pasting.
- Save to file: saves the screenshot as a PNG for organizing, uploading, or editing later. Set your screenshot folder before using this option.
- Copy file path to clipboard: copies the saved screenshot’s path to the clipboard as text.
Copying the file path is available only when Save to file is enabled and Save to clipboard is disabled. When you enable both image copying and file saving, the clipboard holds the image, and the path-copy option becomes unavailable.
The screenshot above shows “save the file and copy its path”: Save to clipboard is unchecked, and the other two options are checked. After capture, the file stays in the screenshot folder, and its path goes to the clipboard.
Choose a combination for your next step
| What you want to do next | Save to clipboard | Save to file | Copy file path | Result |
|---|---|---|---|---|
| Paste the image into a chat or document immediately | On | Off | Unavailable | Image in the clipboard; no screenshot file saved |
| Collect screenshots to organize later | Off | On | Off | PNG saved; clipboard left unchanged |
| Share immediately and keep the original | On | On | Unavailable | Image in the clipboard and a saved PNG |
| Use the screenshot path for uploading, editing, or scripts | Off | On | On | PNG saved and its path copied as text |
Copy the image only: quick answers and feedback
When a colleague asks where a setting is, frame the relevant area, take a screenshot, return to the chat, and press Ctrl+V. In an app that supports image pasting, the capture goes straight into the message.
The same approach works when writing documentation: capture the interface you need to explain and paste it into an editor that accepts images. This combination suits quick answers, brief feedback, and one-off instructions. It saves you from creating and locating a file and keeps temporary captures out of your screenshot folder.
Save the file only: collect now, organize later
When making a tutorial, gathering test results, or preparing product materials, you may need several captures before deciding which ones to use. Enable Save to file and disable the other two options to collect screenshots in your chosen folder.
This combination also helps when you want to keep something else in the clipboard. If you have copied a sentence you need to paste repeatedly, saving screenshots only as files leaves that text in place.
Copy the image and save the file: share and keep a record
When reporting a problem, you may want to paste a screenshot to a colleague immediately and keep the original for a formal report later. Enable both Save to clipboard and Save to file to do both with one capture.
Press Ctrl+V in a chat or issue editor that supports image pasting. A PNG also remains in your screenshot folder, available for uploading, editing, or archiving even after you copy something else.
Design feedback, testing discussions, and customer support can all benefit from this combination: use the image to move the conversation forward, then organize the files you need to retain.
Save the file and copy its path: continue in another tool
If your next step needs the file location, use the combination shown in the screenshot: disable Save to clipboard, then enable Save to file and Copy file path to clipboard.
For example, a web upload form may ask you to select a local image. After taking the screenshot, open the file picker and paste its path into the file name field, where entering a full path is supported. You can locate the new capture without navigating folders or looking for the newest file.
When writing a blog or preparing visual assets, you can also paste the path into an editor’s supported path input or pass it to a script for further processing. AI tools that can read local images can use the path to identify the screenshot file, too.
Here, Ctrl+V pastes path text. To paste the image directly into a chat, switch to Save to clipboard. To send the image to someone else, upload the file. A local path lets tools on your own computer locate the saved image.
Match your screenshot settings to your usual tasks
Find the Screenshot section in OverRec’s settings and choose a combination from the table. If you want to save files, confirm the screenshot folder, then select an area and capture as usual.
Copy images only for quick answers, save files only for ongoing material collection, or combine the two when you need to share and keep a record. If you regularly work with file pickers, editors, or scripts, save the file and copy its path. A few checkbox choices help each screenshot flow into the next part of your work.
Get OverRec from the Microsoft Store, or explore more on the OverRec product page.